Old treats updated for a healthier palate

Do you remember Rice Krispies treats? Maybe you still make them? I don’t. Not anymore, even though they are such a fond childhood memory of mine. I was crazy for them as a kid. I would have to say they were one of my favorite junk food items. I loved them so much that I didn’t leave it up to the fates to decide if I would be able to have one. Finding a Rice Krispies treat depended on a parent (not related to me, mine preferred to purchase their junk food pre-made) making them for some event and then being in the right place at the right time to have one. (I guess with that statement you’ve figured out that I am old enough to predate the advent of pre-packaged Rice Krispies Treats which are a pale shadow of the homemade kind). In order to guarantee a steady supply of these wonderful treats and make sure I had access to as many as my heart desired, I learned to make them. It turns out they are extremely kid friendly to make if you are a kid who can stand a second degree burn or two in the kitchen. I never had a problem making the actual molten goo required to make them stick together, I usually got into trouble after I mixed the cereal into the molten goo and then attempted to form them into the compact mass that would enable them to be perfect squares of crispy sweet goodness. I somehow managed to get my fingers and hands into the incendiary rice crispy mass.

So, you may wonder why I stopped indulging in something so wonderful? I don’t eat much beef or beef products anymore and when I do I choose grass fed. I don’t eat a lot of sugar anymore. The main ingredient in these treats, marshmallows are loaded with gelatin and sugar. I know they make vegan friendly marshmallows now, but I don’t want to go down that slippery path. Not now that I have been doing so well at moving a lot of the processed junk and refined sugars and grains out of my diet.

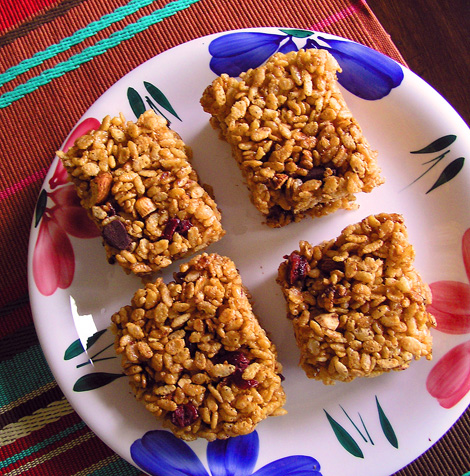
Years ago, I tried to make the treats on the box of my favorite brown rice cereal. They were a disaster. I can’t remember what the ingredients were, but they were horribly sweet and would not stick together. The cereal tasted terrible in them. I gave up on the idea of having a healthier version of my childhood favorite treat until I came across a recipe on the Madcap Cupcake blog. This version used brown rice syrup for the sweetener with the addition of nut butter to cut the sweetness. This recipe looked promising so I bookmarked it and as usual forgot about it. You see, brown rice syrup isn’t an ingredient I am familiar with. I know I have eaten it in some of my favorite processed food from the health food store, but I didn’t know that you didn’t have to be a corporation to buy it. (This is why, I, an omnivore, hang out on vegan blogs. Not only are they nice folks but I learn something all the time!). Anyway, a few weeks ago, I remembered I wanted to make this recipe, so I got a box of brown rice cereal and the brown rice syrup. Today, I finally decided to dive in and give the treats a try. Were they the same as a Rice Krispies treat? Not by a long shot, but to my healthy palate, they were quite wonderful. Lightly sweet and nutty with little hidden surprises in each bite.

I really enjoyed the way these treats turned out, but since I used the bare minimum of rice syrup suggested in Marika’s recipe, the bars had structural integrity problems. They fell apart easily. I might make a little more goo in the same one to one ratio of syrup to peanut butter, or, if I keep them this way, I might form them into little balls next time instead of trying to make big thick bars. In the following recipe, I doubled the salt. I have salt free peanut butter so I knew I would need a teeny extra hit of salt. If you are using regular salted peanut butter, use the lesser amount. I also added 1½ cups total of the “add ins” (nuts, dried fruit, chocolate, etc). This was a full ½ cup more than suggested, but I just love a good “add in”

Brown rice treats

Adapted from crispy rice squares from Madcap Cupcake

1-10 oz box brown rice cereal (I used Barbara’s brand)

¾ cup brown rice syrup

1/8 – ¼ tsp salt (use more if your peanut butter in unsalted)

¾ cup chunky peanut butter

½ cup dried cranberries

½ cup chopped dark chocolate

½ cup toasted almonds, chopped

Olive oil cooking spray.

Spray a 9” x 13” pan with cooking spray. Set aside.

In a small saucepan over medium heat, warm the brown rice syrup and salt. Add the peanut butter and stir until melted and well combined.

Empty the box of cereal into the biggest mixing bowl you can find. Pour the peanut butter mixture over the cereal and mix until well combined. Add the cranberries, almonds and chocolate. Mix until the goodies are well distributed. Pour the cereal mixture into the prepared pan. Smooth the mixture evenly into the pan, pressing to compact it. Let cool for an hour (I missed that last instruction which would explain why my bars wouldn’t stick together. I’m impatient, I tell ya!)

…and now for something completely different

Avocado. Mmmmm. Silky. Luscious. Cooling. Cake… Huh??? If the words avocado and cake make you want to have a Corona with lime to help soften the blow of having those two words appear in the same sentence, then this cake is probably not for you. You can leave now. There is a nice sunny beach somewhere with fish tacos and beer and guacamole. You are excused. If avocado and cake made you perk up and be curious, stick around with me for a minute, you won’t be disappointed.

I first became intrigued with the idea of avocado in a baked good after stumbling onto the recipe for avocado bread on the avocado.org site a couple of years ago. People use zucchini, carrots and bananas in baked goods. With it’s high fat content and creamy flesh, why not avocado too? My only problem: although I live in the middle of avocado country and I can get huge Hass avocados for a buck a piece, I am very miserly with them. I didn’t want to waste a good avocado or two on something that might suck.

This week, we managed to buy too many of these wonderful fruits, and like bananas, the window of yummy goodness is very short indeed. I had two avocados that were quickly heading past their prime. Today was the day to experiment.

The experiment went well. I have to admit that I was a little too bold with my experiment and the addition of chocolate chips, while well intentioned was possibly a mistake. They made the cake a little too rich. We tried a nibble of cake that somehow didn’t get polluted with chocolate and the dates and walnuts alone were just perfect. If you just have to have chocolate, it was pretty tasty but the cake would have been somehow more pure and elegant without the chocolate.

Why is this cake a surprise you ask? It surprised me with it’s super moist texture. Avocados are high in oil. If you look at the recipe, there is no added fat besides the flesh of the avocado. I used whole wheat pastry flour and yet, this cake was as moist as a cake made from cake mix. Just fabulous and yet another reason to drop the chocolate from the recipe so that you can enjoy the texture with just a little fruit and nuts to compliment it.

Avocado surprise cake

2 cups whole wheat pastry flour

Zest from 1 large orange, chopped

1 tsp baking soda

½ tsp baking powder

½ tsp cinnamon

¼ tsp salt

½ cup bittersweet chocolate chips, roughly chopped (optional)

½ cup fresh dates, chopped

½ cup walnuts

½ cup honey

¼ cup orange juice (about 1 large orange, juiced)

1 cup avocado (2 large), mashed until smooth

1 egg, lightly beaten

½ cup plain yogurt

Preheat the oven to 350 degrees, F. Oil and flour a bundt pan.

In a large bowl mix together, pastry flour, orange zest, baking soda, baking powder, cinnamon, salt, chocolate chips (if using), dates and walnuts.

In another large bowl combine honey, orange juice, avocado, egg and yogurt. Mix until well combined.

Add the wet ingredients to the dry ingredients. Mix until just combined. Pour batter into the prepared bundt pan. Bake for 35 – 40 minutes until the cake is browned and a toothpick inserted into the center comes out clean.

How to make cocoa powder feel decadent

They say one of the keys to sticking to a sensible eating plan is to make sure you do not deny yourself any of your favorite foods. This sounds simple enough. However, there is a catch (isn’t there always a catch?). On the surface this statement is fine if you are maintaining a healthy weight, but if you need to lose weight, having a chocolate bar can make it so that you need to push otherwise healthy food off of your daily menu to compensate for the large amount of calories you just took in. Such a strategy can cause hunger because it’s the healthy food that makes us feel full and satisfied. But “they” have a point. Have you ever had a craving, you didn’t give in to, but you ended up eating around the craving, thereby eating way too many calories and still not feeling satisfied? I have. That’s why I am always on the lookout for clever substitutions for things I might crave.

As I made my way through the blogosphere a few weeks ago, I stumbled onto some delicious sounding healthy biscotti. These whole grain gems were spiked with molasses and had gingerbread type spices. I bookmarked the recipe for later but I kept going back to look at it.

Molasses. So complex and completely underrated. We buy it and leave it sitting alone and neglected in our pantries. But why do we use it in the first place? Loaded with minerals, which is a good thing, it has a bad reputation because although it is sweet it has a strong flavor that takes over most recipes. But… what if molasses could be used as a complement to another flavor? One of the things I love about dark chocolate is the fact that like wine, it has a flavor profile that can exhibit hints of tannins, fruit, and spices. It is hard to get that sort of flavor out a baked good made with cocoa powder. But… I started to think, what would molasses do to that cocoa flavor? Could it make it richer? The answer is yes. With just a few tweaks I baked up some biscotti that are rich and satisfying, but are still healthy and low in fat and calories. One cookie is enough to satisfy and still keep me right on track; and isn’t that the key to moderation?

Mexican chocolate biscotti

Adapted from the almond molasses biscotti on Anja’s Food 4 Thought blog

1 ¼ cups whole wheat pastry flour

½ cup unsweetened cocoa powder, sifted if clumpy

½ tsp baking powder

¼ tsp salt

1 ½ tsp cinnamon, ground

½ cup almonds, roughly chopped

1 egg

½ tsp vanilla extract

¼ tsp almond extract

½ cup honey

2 tbsp blackstrap molasses

Preheat oven to 350 degrees F. Line a baking sheet with parchment paper.

In a large bowl, combine pastry flour, cocoa, salt, baking powder and cinnamon. Mix until well blended. Add the chopped almonds.

In another bowl, whisk together the egg, vanilla extract, almond extract, honey and molasses. Add the wet ingredients to the dry ingredients. Stir until all ingredients are combined well.
Turn the dough out onto the parchment lined sheet. Form a flat long log, about 1 inch high and 5 inches wide. Bake for about 20 to 25 minutes or until center feels firm to touch.

Let the log cool for about 15 minutes or until cool enough to handle. Use a serrated knife and cut 1/2 inch slices off the log. Reduce the heat of the oven to 300 degrees F. Spread out the biscotti slices on the baking sheet and bake for another 20 minutes. Let cool completely.

What do you do when you run out of eggs?

Years ago, I was a fiend for pressure cooking. Once I acquired my pressure cooker, I cooked everything I could find in it, got bored and then put it in a cabinet never to be heard from again. The author of my favorite pressure cooker cookbook, Lorna Sass, put out a vegan cookbook around that time. It was called Recipes from an ecological kitchen. Poor Lorna. I stopped using the pressure cooker book and the vegan book got relegated to the bookshelf as a reference manual for grain cookery. One thing in the vegan book that has always fascinated me was her use of flax seed as a substitute for eggs. She would grind raw whole flax seed in a blender, add water and blend for up to a minute to form a thick paste. She states in the cookbook that it works just like eggs in her recipes and makes for light and fluffy baked goods. It sounded like magic. It sounded too good to be true!

Even when I was a vegetarian, I still ate eggs and dairy. I love my eggs and dairy! I still do. I’ve never used her flax seed method because I always had eggs in the house and never had flax seed in my pantry. Now I bake bread. I have more flax seeds than I know what to do with. Today, I had no eggs. I was completely out and I wanted a muffin with my morning tea. Today seemed like a great day to try an experiment.

Over the past couple of months, I have baked muffins using Herbert a couple of times. Once was the delicious cocoa, coconut and pecan muffins and recently, I baked a recipe from my blog friend over at the Lost World of Drfugawe. John made these amazing cornmeal muffins. When I saw them, I had to make them. They turned out delicious, tall and fluffy. Drizzled with raw honey, they were superb. One thing that surprised me about his recipe was that he used a full tablespoon of baking powder. I followed the recipe, making just a tweak here or there, to be rewarded with such light fluffy corn muffins. When I thought about it, it made sense. There are acids that build up with the starter. The neutralizing powers of baking powder and acids are what makes baked goods rise. Since I planned to use starter, buttermilk, lemon juice and strawberries, all tart ingredients, I borrowed this little bit of baking wisdom from John.

My muffins were tall and fluffy. The flax seed paste mimicked the eggs as advertised but they also lent a nutty grainy flavor that complimented my toasted walnuts. I used a spare amount of honey for sweetener, so the muffins ended up on the less sweet side and the springtime strawberries are a bit tart but altogether, I have to call these muffins a huge success. Just the perfect morning breakfast food to go with tea or coffee. I was told by an appreciative boyfriend that these muffins are pure strawberry goodness.

These springtime muffins are going to YeastSpotting, the place to go for all your bread baking porn.

This recipe contains buttermilk because I like what buttermilk does to baked goods, but if you want to make them vegan, just substitute soymilk or rice milk for the buttermilk and agave syrup for the honey.

Egg free sourdough strawberry and walnut muffins

3 tbsp flax seeds

½ cup water

2 cups whole wheat pastry flour

1 tbsp baking powder

¼ tsp baking soda

¼ tsp salt

1 ½ tsp lemon zest

¼ cup canola oil

½ cup honey

½ cup buttermilk

½ cup sourdough starter

1 tbsp lemon juice

1 cup coarsely chopped, toasted walnuts

1 ¾ cups diced fresh strawberries

Preheat the oven to 350 degrees F, Place the raw walnuts in a small iron skillet. As the oven gets up to temperature, toast the walnuts for 5 – 8 minutes, watching them to make sure they don’t burn. Remove from oven and cool.

Spray two six cup muffin tins with olive oil spray and set aside.

In a blender, grind flax seeds to a powder. Add water and blend for thirty seconds until thickened. Set aside.

In a large bowl, mix flour, baking powder, baking soda, salt and lemon zest.

In another large bowl, mix together all of the flax seed mixture with the canola oil, honey, buttermilk, sourdough starter, and lemon juice. Add wet ingredients to the dry ingredients and mix until well combined. Let stand for a few minutes to rise a little bit. Gently stir in the walnuts and the strawberries.

Spoon the batter evenly into the muffin cups. Put the muffin tins into the oven and bake for 20 – 25 minutes until the tops are browned and a toothpick inserted into the center of the muffins comes out clean.

If candy bars grew on trees

I wish candy bars grew on trees. Whenever that urge for a treat would hit me. I would go to my candy bar tree, reach up and harvest a mouth watering treat. If candy bars grew on trees, surely they would be full of vitamins and minerals to make us healthy. I have a feeling candy bars would be hard to grow organically. I think they would be very attractive to ants.

If candy bars grew on trees, there would be less garbage littering the streets. If candy bars grew on trees, I bet we would buy them from small farmers or grow them in our backyards instead of purchasing them from large corporations because they would be farm fresh and delicious instead of coming from places and people we don’t know or trust.

You know and I know the candy bar tree is a fantasy, but what if a candy bar could come from trees instead of grow on trees? Would they be just as virtuous? I think so. I can’t lie to you and tell you that a candy bar that comes from trees would have less calories than a regular candy bar, but I don’t think I would be lying if I told you that it would be healthier for you. It might take some getting used to, because it would not be the same as biting into a chunk of fat, sugars and salt, but I think you could easily get used to a candy bar that was made of luscious whole food ingredients.

Wanna make a candy bar?

The first tree we’ll have to look for is Prunis dulcis: The almond tree.

Photo by Alfonso, creative commons 2.0 license
 
 We’ll go pick some almonds. We’ll roast them and use them whole and chopped.

Our second tree will be Phoenix dactilylifera: The date palm.

Photo courtesy Wikipedia.org, creative commons 2.5 license


We’ll pick close to a couple of dozen dates and pit them

Those first two trees can be found within driving distance of me, but the third one grows in the tropics. We’ll have to get on a plane to find Theobroma cacao: The cocoa tree.

Photo by Claus Bunks courtesy of wikipedia, public domain license


We’ll need to pick the fruits, ferment them, clean the beans, roast the beans, liquefy them and then make dark chocolate.

Ha! You knew I was lying about harvesting the ingredients, didn’t you? If not, I got you! Valrhona makes a good 71% bittersweet chocolate, let’s use that.

That’s it. Our chocolate bars are three ingredients. These three ingredients are rich in manganese, vitamin E, magnesium, iron, potassium, B vitamins, fiber, polyphenals and minerals. The bars are super healthy and luxurious. Can your snicker’s bar claim that?

Dark chocolate covered almond stuffed dates

3 ½ oz bar bittersweet chocolate (I used a 71% dark chocolate bar)

About 20 pitted fresh dates. Use Deglet noor or any other large date

1 cup roasted whole almonds. (I used unsalted almonds. Using salted almonds is your call but I don’t think it’s necessary).

Line a cookie sheet with parchment.

Stuff each date with one or two almonds depending on the size of the date. Chop the remaining almonds coarsely and set aside. Melt the chocolate in a double boiler stirring until smooth. Dip a stuffed date into the chocolate, turning to coat. Set it on the parchment lined tray and sprinkle with chopped almonds. Repeat with each stuffed date. Put cookie sheet into the refrigerator for at least 30 minutes to help the chocolate set. Serve immediately or store in a airtight container in the refrigerator


How to destroy a fairly clean kitchen in under 60 seconds

You would think after the seeded bread I made last week that I would be done with seeds. But… nooooooo! I have a problem with a short memory span. You see, I felt annoyed that I spilled seeds all over the kitchen when I was baking the bread. I then became more annoyed when seeds spilled all over my oven and I burned them. Seeds spilled everywhere when I cut into the loaf and each time I cut into it thereafter. Maximum annoyance. I cleaned up all of these seeds, but somehow, they kept reappearing. They found nooks and crannies to inhabit. Some of them thought the microwave was a nice spot to sit under. Some of them got on the floor and became world travelers showing up in bathrooms and bedrooms. My counters looked clean to me but I kept finding seeds in the grout of the tiles.

I wanted to make the seeded bread again this week and just skip making something new for YeastSpotting. (It was so good that I didn’t care what price I’d pay for another loaf). The problem is that we never finished the first loaf and I kept waiting for it to be eaten before committing a full day to a loaf of bread. Thursday showed up, no bread. I was looking in a cabinet and spied a box of our favorite crackers. These are really special crackers. Made of Spelt and covered in seeds, they are delicious! I came to the realization that they are an extravagance. We have been paying $6.89 for an 8 oz container of these crackers which we can easily polish off in a week. After figuring this out, it has been on my to do list to bake crackers. Today was the day.

The first thing I did was decide on the seeds. I thought an exotic mixture would be nice. I would mix sesame, poppy, fennel and for a little kick, brown mustard seeds. The brown mustard seeds come in a small Ziploc plastic bag. I opened the bag to measure out the seeds, something slipped and about a tablespoon of mustard seeds went flying, over the counters, onto the floor, into crevices, into my clothes (so that I could easily help them become world travelers). I took a deep breath. Gave up on immediate containment and proceeded with the recipe. My next error was to believe I could get the seeds to stick to the crackers without anything to bind them to the surface of the cracker. I somehow thought I could sprinkle the seed mixture on and then push the seeds into the surface of the cracker. Since I have the muscle tone of Napolean Dynamite’s brother Kip, that did not work out well. If I kept the fully baked crackers horizontal, the seeds stayed put, as soon as I moved them or tilted them in any way: disaster! So when I transcribe the recipe for you, I am going to tell you to make an egg wash to stick the seeds on. I have not tested it, but it worked for the bread last week so I’m hoping it will be fine.

I enjoyed these crackers as a light lunch today, (held horizontally to keep the seeds on), topped with a fine quality aged cheddar and Fuji apple slices. The crackers taste like flaky whole grain pie crust with the savory bite of the seed blend. They went so well with the cheese and fruit!

I am submitting these sourdough crackers to this week’s YeastSpotting event. Click on the link to see what everyone baked this week!

Seeded Sourdough Crackers

Crackers:

1 ½ cups stone ground whole wheat flour

½ cup rye flour

1 tsp salt

4 tbsp flax seeds

¼ cup cold butter

2 tbsp olive oil

1 cup active sourdough starter

Topping:

4 tsp sesame seeds

2 tsp fennel seeds

2 tsp brown mustard seeds

2 tsp poppy seeds

*Egg wash made with an egg yolk beaten with 2 tbsp water

Preheat oven to 375 degrees, F.

In a large bowl, stir together whole wheat flour, rye flour, salt and flax seeds. Using a pastry cutter, cut cold butter into the flour mixture until it resembles coarse corn meal. Make a well in the flour mixture. Pour in the oil and sourdough starter. Mix with a silicone spatula until well combined. Turn the dough out onto a floured board and lightly knead to make sure all the flour and liquid is mixed well. Do not over knead, you just want to make sure everything is combined. Form dough into a ball, flatten and roll out to 1/8” thick. Using a 2” round cookie cutter, cut dough into circles. Transfer crackers to two parchment lined cookie sheets as you cut crackers. Using a fork, pierce the crackers three times. Brush with egg wash and sprinkle with seeds. You will have lots of scraps. When you are done cutting the first round of crackers, gather the scraps and carefully press them back into a ball (do not over work the dough), flatten dough and roll out to 1/8”, proceed with cutting more crackers and topping them with seeds. You can do this with the scraps a couple of times until most of the dough is used up. Once all of the crackers have been cut and seeded, transfer the cookie sheets to the hot oven. Bake for 13 – 15 minutes until browned, rotating the sheets from the upper to the lower racks of your oven halfway during baking for even browning. Remove crackers from the oven and transfer to racks to cool completely before enjoying.

*I did not brush an egg wash onto the crackers. The pictures are a sham! The seeds did not stick to the crackers. I have not tested an egg wash on this recipe, but this method worked for the bread I baked last week. It should work fine.

The sourdough madness continues!

CherryCoffeeCake1

Sometimes I feel like I am on the brink of sourdough madness. I am a bit obsessed. This week, however, I feel a lot better about myself. I stumbled onto a couple of recipes that put things into perspective for me. I can still call myself an avid hobbyist baker. I am not yet mad. I have not yet used sourdough as a batter for frying red meat. I have not yet put strange vegetables in my bread. I’m all right.
 
Things started quite innocently this week with a conversation with my best friend. I had emailed her to say thank you for sending me two gorgeous, scrumptious jars of homemade jam. One peach the other blueberry. She emailed me back and asked me if I saw the plum kuchen in this month’s Gourmet magazine and could it be made with sourdough. Well of course I noticed the plum kutchen in all of it’s beauty and glory. I noticed it again when it appeared with an even prettier photo on Smitten Kitchen. I did of course think I’d like to make it with sourdough.
 
I’ve been baking with my sourdough for a couple of years now but I had yet to try to make a cake. I first noticed sourdough cake when thumbing through the Joy of Cooking and have always had it in the back of my mind to bake a cake someday. Since I have no experience baking any cake with sourdough, I emailed my friend back that one of us would need to try it and report back. (I’m a coward, I know!). It was my first impulse to shy away from converting that recipe to sourdough because I have no understanding of how sourdough works in baked goods other than bread.
 
Today that changed for me. Instead of doing responsible adult things, I started to obsess about that kuchen and wonder what the heck yeast does in cakes. My research did not come up with an easy answer so I started looking at recipes. A particular recipe caught my eye because all of the ingredients or some reasonable substitutions were available here at home. I would just have to bake something and see what I think sourdough does in the recipe.
 
The recipe I chose for cherry sourdough coffee cake looked good but there were a couple of changes I made. Here’s why: the normal thing to do in any cake recipe I’ve baked in the past is to cream the sugar and butter. This results in a nice fluffy cake. The baker who created the recipe has you mix together all the dry ingredients and cut the butter into the mixture like you are making pie. Normally I wouldn’t agree with this but it was too late. I had already mixed the dry ingredients before I realized what I was being instructed to do. Once I mixed the wet ingredients into the dry ingredients, I had a dough not a batter. This may be correct but it could be an inconsistency that happened due to our starters? As far as I can tell we both use 100% hydration starters but I panicked and added a quarter cup of milk to thin things out a little. I used sweet cherries not tart cherries so my filling was sweeter than it should have been. I used more cherries because I love them and 1 ½ cups just didn’t seem like enough.
 
I felt a bit of apprehension about this cake as I put it in the oven. I felt like I had uneven cake layers (too much batter on bottom, not enough on top). I tried to spread the top layer of batter over the cherries and the fruit bled into the batter. I was happy to realize that the crumble topping would cover things up well. I still felt odd about the addition of milk to the dough to change it into a thick batter. My apprehension cleared when I got a whiff of an exquisite smell coming from my oven a few minutes later. I went to peek at it and the flat looking bit of batter in the pan had puffed up tall. It was so pretty!

So. I think I will have to try a few more cakes and muffins to really analyze what is going on here, but I think the starter worked as a dough conditioner. I used unbleached white flour for this cake, but it came out silky like I had used cake flour. The rise on this cake was crazy. I think the yeast helped in that regard. As for that malted yeasty flavor, we got a hit of on the first bite but then it went away as we kept eating and tasting. Now that I think about it, that could be why I see so many recipes for chocolate sourdough cake. It could be it works better with stronger flavors. But…don’t let the idea that the cake has a yeasty flavor deter you. This cake was wonderful. Please make it for someone you love today.

I am submitting this coffeecake to YeastSpotting on Wild Yeast. Click here to see what other delicious things were baked up this week.

CherryCoffeeCake2

Cherry sourdough coffee cake
Adapted from this recipe by Nancerose on grouprecipes.com
 
Cake:
 
1 ½ cups unbleached white flour
 
 ½ cup evaporated cane juice or granulated sugar

½ tsp baking soda

½ tsp baking powder

¼ tsp salt

½ cup unsalted butter

½ cup sourdough starter (mine was fed the night before)

1 large egg, beaten

1 tsp vanilla extract

¼ cup milk (I used nonfat, any kind should work)

Filling:

2 cups frozen sweet cherries

1 tbsp lime or lemon juice

½ cup evaporated cane juice or granulated sugar

2 tbsp corn starch

Topping:

1/3 cup rolled oats

¼ cup packed brown sugar

¼ cup chopped pecans

3 tbsp unbleached white flour

¼ cup unsalted butter

Filling:

In a medium saucepan, pour in the frozen cherries and cook on high heat until they defrost and begin to boil, about 5 -7 minutes. Lower to a simmer. Add lime or lemon juice. Mix together the sugar and cornstarch. Stir the sugar mixture into the cherry mixture and continue to simmer for 2 or 3 minutes until the mixture thickens. Remove from the heat and allow it to cool completely while you proceed with the recipe.

Cake and topping:

Preheat the oven to 350 degrees, F.

In a large bowl, Mix together the flour, sugar, baking powder, baking soda and salt. Using a pastry cutter, cut the butter into the dry ingredients until it looks like coarse crumbs. In another bowl, mix the egg, starter, vanilla and milk. Add the wet ingredients to the dry ingredients, mixing until just combined.

For the topping: in a small bowl, mix together the oats sugar nuts and flour. Using the pastry cutter, cut the butter into the dry ingredients until it forms coarse crumbs. Set aside.

Butter an 8” x 8” square pan. Pour half of the cake batter into the pan. Pour the filling over the cake batter and spread it out with a silicone spatula. Drop the remaining batter over the filling in small amounts. Use the spatula to carefully spread the batter over the topping. It can be sloppy but you want to make sure there are no giant holes for the filling to come gushing out of. Sprinkle the topping ingredients evenly over the cake. Bake for 35 – 40 minutes. Check the cake at 35 minutes by using a toothpick to see if it comes clean. If it needs a few more minutes and you think the nuts are browning to quickly, use a sheet of aluminum foil to tent over the cake and keep the topping from burning. Cool the cake on a wire rack before serving.


An all natural treat

Almond Cookies

Last week, I dusted off the Laurel’s Kitchen Bread Book and to my surprise, made the best rye bread I have had.  Such success got me curious for more.  I went back to my library and found my copy of The New Laurel’s Kitchen Cookbook (which was new in 1976, reprinted in 1986).  As I perused the book, I began to remember why I snubbed this book to begin with.  In laurel’s kitchen, food revolves around whole wheat flour, vegetables and cottage cheese.  This book is very crunchy indeed.  I was looking at the small dessert section and noticed the peanut butter cookie recipe.  There was a variation that uses almond butter…very intriguing.   As my eyes scanned the recipe and my brain trotted behind slowly, I came to realize there is no butter or margarine in this recipe.  It only utilizes the fat in the nut butter.  Fascinating!  As I keep reading it dawns on me, there is no refined sugar in the cookies, just honey.  Can you really make a cookie with no saturated fats and no crystallized sugars??  Interesting…

I have been itching to try these for days and finally got into the kitchen to play.  I had just enough almond butter.  Surprisingly, I had almond extract, old but still useable.   My only problem occurred because Mimi staying home all the time equates to Mimi cooking a lot and I was short on honey.  What would happen if I supplemented the honey with pure maple syrup?  I crossed my fingers and decided to find out.  I felt like I wanted something more in these so I decided to add dried fruit, I wanted dried blueberries or dried cherries but don’t have them.  My Boyfriend wanted dried apricots.  Apricots it is!

I have a really hard time making cookies the right size so a recipe that should make between three and four dozen small cookies yielded 23 larger cookies after I adjusted the baking time.  But I bet you don’t mind a bigger cookie do you?  I sure don’t!

So the question is still on the table, can you make a cookie with no butter or refined sugars?  The answer is a resounding yes!  These cookies had a shatteringly crisp crust and a light as air middle.  They were sweet with a creamy mouth feel.  I used chunky almond butter so between the almond chunks and the diced dried fruit, there were crunchy and chewy bits in every bite.  Delicious!!!!!

The trio who wrote the Laurel’s kitchen books should be commended.  They figured out how to cook with natural foods without relying on lots of dairy or refined ingredients for flavor; a very clever and masterful way to cook indeed.

Apricot Almond Butter Cookies

Adapted from The New Laurel’s Kitchen Cookbook

1 cup crunchy almond butter

1/3 cup honey

2/3 cup grade B Maple Syrup

1 egg, beaten

1 ½ tsp almond extract

½ tsp salt

½ tsp baking soda

2 cups whole wheat pastry flour

½ cup diced dried apricots

Blanched or slivered almonds for decorating

Preheat your oven to 350 degrees, F.

In a large bowl, beat together almond butter, honey and maple syrup.  Beat in the egg and almond extract. 

In another bowl, mix together the flour, salt, baking soda and diced dried apricots.

Mix the dry ingredients into the wet ingredients until well incorporated.

Line two baking sheets with parchment paper.  Drop the cookie dough by generous rounded tablespoons.  The cookies should be walnut sized.  You should get about 23 cookies.  Decorate with 2 – 3 slivered almonds or 1 blanched almond.

Bake the cookies for 15 – 16 minutes until lightly browned.  Remove from the oven and allow the cookies to cool for a couple of minutes on the pan.  They will be very soft at first.  Transfer the cookies to wire racks and cool completely.

A very healthy side salad indeed

carrotraisonsalad

After a year and half or so of blogging, I am beginning to feel like I am getting recipe amnesia.  There are some things I cook that are such a part of my repertoire that I am certain I have shared the recipe with you.  I make the most delicious, the healthiest, thebest ever carrot raisin salad…. and I was sure it was on this blog until I did a search of the recipes here and found out that I had omitted it.  What a terrible omission!


I make carrot raisin salad whenever I need something quick and tasty to eat during a barbecue.  I make this salad for people I love because I know it makes them healthy and happy and I used to make it a lot when I took my lunch to work ages ago. (Which is a habit that I should go back to, but can’t seem to do.  I am a bit of a hermit and eating at home suits the hermit habit better).  This salad is so clean and healthy tasting that it never occurred to me that some people cannot even stand the sight of carrot raisin salad.  Carrot raisin salad is absolutely scorned by some people!  Back when I used to bring lunches, I brought a big container of carrot raisin salad.  I had been looking forward to eating it all day.  When I opened the container and one of my coworkers saw the bright orange glare of my salad he exclaimed “Ewwwwww!   Carrot Raisin salad!  Gross!!”  Hmmm… now that I think about it, maybe that’s why I don’t take my lunch to work anymore. Anyway, please don’t listen to my coworker.  This is no ordinary carrot raisin salad.  Please try it even if you aren’t a big fan.  I think you may be surprised by how much you like this version.


A note:  Use fewer carrots if you like a sweeter moister salad.  More if you want a milder carrot raisin salad.  The last time I made this, I realized that I no longer measure the carrots.  I shredded three enormous farmers market carrots and I’d estimate that they yielded at least seven cups of carrots.  The salad was very mellow and delicious with less dressing and raisins to carrots.  Also, I cannot remember where this recipe came from but I acquired it years ago during the low fat craze.  I prefer to stick with the original intention of this salad to be low fat and make it with reduced fat mayo. It is not very rich this way.  You can certainly make it with full fat mayo (I have before) but you may want to adjust the mayo to your taste, using real mayo will make the flavor richer.


Carrot Raisin Salad

4 cups (or more) shredded carrots


½ cup raisins


3 tbsp reduced fat mayonnaise


1 apple, shredded


½ cup natural apple juice


Shred the carrots and the apple in a food processor (you’ll be happy you didn’t have to do this by hand).  Combine all of the ingredients in a large bowl, mixing the salad well.  Cover and chill for at least one hour before serving to allow the flavors to blend.  Mix again before serving to make sure the dressing is distributed throughout the salad.


Quieting that Cheesecake Jonz

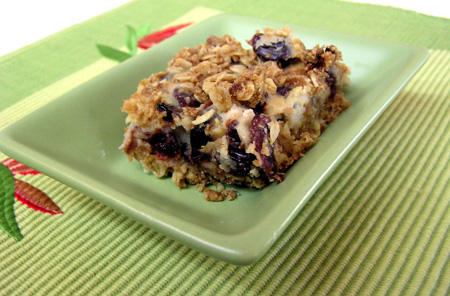
Sunday is always grocery shopping day for us or should I say grocery trauma day.  Neither of us likes this chore.  I refuse to do it by myself and tempers flair.  Today was a relatively calm shopping day as we only got a little miffed at each other and the only catastrophic event had to do with the last minute purchase of shrimp at the Farmer’s market that leaked all over my still fresh and new smelling car.  While we were out today, I tried to calm myself by picking up the latest copy of Cooking Light magazine.  Being the passenger, I was thumbing through it on the way home when I saw something amazing that stopped me in my tracks.  Something called Cranberry-Oatmeal Bars.  A local health food restaurant we frequent makes something similar out of fresh berries and it tastes like cheesecake wedged into the middle of a fruit cobbler.  The restaurant version is definitely something I have been merely allowing myself only a bite of because it is fattening just to look at!  So much for health food dessert! (Which is an oxymoron unto itself, isn’t it?).  I mentally took a tally of the ingredients thinking back to what we had at home in our pantry and refrigerator.  I was pretty sure I could make these bars without ending up at another grocery store.


Well I got home and had to start making adjustments.  My boyfriend did not want this to be too sweet.  He never likes to eat too much sugar so I set about deciding how best to reduce the sweetener and still have this taste yummy.  I found out that I did not have enough dried cranberries but I did have plenty of dried fruit if I used both cranberries and dried cherries.  I was already planning on making these even lighter than the original recipe because I had light sour cream instead of the full fat stuff but uh oh!  I didn’t have enough.  I decided to make up the deficit with non-fat plain yogurt. 


All of the decisions on how to change up the recipe were made and then I realized that my pan was too big.  I tried to use a 9” x 13” pan for an 11”  x  7” pan but the bigger size coupled with the fact that I cut the sugar in half for the crust screwed things up volume wise.  I had to settle on a 9” x 9” square pan.  The original recipe made 24 squares mine made 9.  I am wondering if they cheated in the picture in the magazine because their bars didn’t look much thinner or smaller than mine but they got a much lower point count per serving than mine did when I used the recipe builder on the Weight Watchers site.  You would think that my bars were gargantuan compared to the originals but they probably aren’t.  So what does that mean?  I am disappointed in the fact that I could eat a light lunch for the points I used up on one of these but…  they were so, so very delicious for being so low in fat and sugar that it was worth the splurge and I would gladly do it again and again and again!!!! 


Please make these.  You will be very happy you did.


Cranberry-Cherry Oatmeal Bars

Adapted from the November 2008 issue of Cooking Light Magazine


Crust:

1 cup whole-wheat pastry flour

1 cup rolled oats

¼ cup packed dark brown sugar

¼ tsp salt

½ tsp ground cinnamon

6 tbsp unsalted butter, melted

3 tbsp orange juice

Cooking spray


Filling:

2/3 cup dried cranberries

2/3 cup dried cherries

½ cup light sour cream

¼ cup nonfat plain yogurt

2 tbsp evaporated cane juice or granulated sugar

2 tbsp whole-wheat pastry flour

1 tsp vanilla extract

1 tsp grated orange rind

1 large egg white, lightly beaten


Preheat your oven to 325 degrees F.  Coat your pan with cooking spray.

In a medium bowl, combine flour, oats, brown sugar, salt and cinnamon.  Break up any chunks of brown sugar with your fingers and mix well.  Combine the flour mixture with the melted butter and orange juice.  Mix until it is combined and crumbly.  Reserve a half-cup for the topping and then press the remaining crust into the bottom of your 9” x 9” pan.


 In another bowl, mix together the dried cranberries, dried cherries, sour cream, yogurt, cane juice, flour, vanilla, orange rind and egg white until well combined.  Spoon the filling over the crust in your pan.  Crumble the remaining crust over the top of the filling.  Bake for 40 minutes or until the edges are golden and the filling seems set.  If you can stand waiting, cool these completely in the pan on a wire rack (we could not wait more than a few minutes and ate them just warm.  The cookies did not seem worse for wear due to this poor treatment).


« Older entries